Car detailing at home is an incredibly rewarding activity for car enthusiasts and owners alike. Not only does it save money compared to professional services, but it also allows you to take full control over the care and maintenance of your vehicle. This comprehensive guide walks you through the essentials of car detailing, explaining techniques, tools, and products that will help you achieve a showroom-quality finish right from your driveway.
Understanding Car Detailing: What Does It Involve?
Car detailing is more than just washing a car. It’s a meticulous process aimed at cleaning, restoring, and protecting both the interior and exterior of a vehicle. Unlike a regular car wash, detailing focuses on every nook and cranny, ensuring your car looks and feels as good as new.
Exterior Detailing
Exterior detailing involves cleaning and restoring the car's outer surfaces, including paintwork, wheels, windows, and trim. This process often includes washing, decontaminating, polishing, waxing, and protecting the car’s exterior.
Interior Detailing
Interior detailing focuses on deep cleaning the car’s cabin. This includes vacuuming carpets, cleaning upholstery, conditioning leather, and sanitising hard surfaces. The goal is to create a clean and comfortable environment free from odours and dirt.
Why Is Detailing Important?
Regular detailing extends the life of your car’s materials and finishes, boosts its resale value, and enhances your driving experience. For enthusiasts, it’s also an enjoyable way to connect with their vehicles.
Essential Tools and Products for Home Detailing
Starting your detailing journey requires the right tools and products. Investing in quality items will ensure professional-grade results.
Cleaning Tools
- Microfibre Towels: Ideal for drying, polishing, and buffing without scratching surfaces.
- Buckets: Use at least two buckets—one for soapy water and one for rinsing.
- Detailing Brushes: Great for cleaning intricate areas like vents, seams, and wheels.
- Vacuum Cleaner: A high-powered vacuum is essential for interior cleaning.
- Wash Mitts and Sponges: Choose soft, non-abrasive materials to avoid damaging paint.
Detailing Products
- Car Shampoo: Opt for pH-balanced shampoos that are safe for all surfaces.
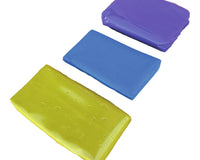
- Clay Bar: Removes embedded contaminants from paint.
- Polish and Compound: Restores gloss and removes minor imperfections.
- Wax or Sealant: Protects paintwork from environmental elements.
- Interior Cleaners: Include fabric, leather, and plastic-specific cleaning products.
Step 1: Preparing Your Vehicle for Detailing
Preparation is a critical step in car detailing that ensures effective results. Skipping this stage can lead to subpar outcomes or even damage your car.
Choose the Right Location
Select a shaded area to avoid direct sunlight, which can cause cleaning products to dry too quickly, leaving streaks and residues.
Assemble Your Tools and Products
Gather all your cleaning tools and products in advance. Having everything within reach will streamline the process and save time.
Inspect Your Vehicle
Before starting, inspect your car to identify areas requiring extra attention. Look for scratches, stains, or spots that need special care.
Step 2: Exterior Cleaning and Decontamination
A thorough exterior clean is the foundation of car detailing. It removes dirt, grime, and contaminants, paving the way for further treatments.
The Two-Bucket Wash Method
Use the two-bucket system: one bucket for soapy water and another for rinsing your wash mitt. This prevents dirt from being reintroduced to the car’s surface, minimising the risk of scratches.

Decontaminating with a Clay Bar
After washing, use a clay bar to remove stubborn contaminants like tar, sap, and industrial fallout. Lubricate the surface with a detailing spray and glide the clay bar gently to lift impurities.
Drying the Car
Use a high-quality microfibre towel to dry the car. Pat the surface instead of rubbing to avoid swirl marks.
Step 3: Polishing and Paint Correction
Polishing is the key to restoring your car’s paint to its original shine.
Choosing the Right Polish
Select a polish based on your car’s condition. Use a mild polish for minor imperfections and a compound for deeper scratches.
Applying the Polish
Apply polish using a dual-action polisher or by hand with an applicator pad. Work in small sections, using circular motions to evenly distribute the product. Buff off excess with a clean microfibre towel.
Step 4: Protecting the Paintwork
Once the paint is clean and polished, protect it with a wax or sealant.
Applying Wax
Wax adds a layer of protection and enhances gloss. Apply in thin, even layers using an applicator pad. Allow it to haze over before buffing with a microfibre towel.
Sealant or Ceramic Coating
For long-term protection, use a paint sealant or ceramic coating. These products offer superior durability and hydrophobic properties, making future cleaning easier.
Step 5: Interior Detailing
The interior is where you spend most of your time, so keeping it clean is crucial for comfort and health.
Vacuuming and Cleaning Surfaces
Start by vacuuming carpets, seats, and crevices. Use detailing brushes for hard-to-reach areas. Follow up by wiping down surfaces with appropriate cleaners.
Conditioning Leather and Fabrics
If your car has leather seats, use a leather cleaner and conditioner to maintain suppleness and prevent cracking. For fabric seats, a fabric cleaner will remove stains and freshen the material.
Step 6: Wheels and Tyres
Wheels and tyres often harbour the most dirt, so they require special attention.
Cleaning the Wheels
Use a wheel cleaner and a dedicated brush to remove brake dust and grime. Rinse thoroughly to avoid leaving residues.
Dressing the Tyres
Apply a tyre dressing to restore a rich, black finish and protect against UV damage. This step also adds a polished look to your car.
Step 7: Finishing Touches
The finishing touches elevate your detailing job to a professional level.
Cleaning Windows and Mirrors
Use a glass cleaner to achieve streak-free clarity on windows and mirrors. Wipe in a vertical and horizontal pattern to avoid streaks.
Adding a Quick Detailer Spray
A quick detailer spray adds a final layer of gloss and protection, ensuring your car looks flawless.
Tips for Maintaining Your Detailed Car
Regular maintenance ensures your hard work lasts longer. Wash your car weekly, touch up with detailer sprays, and reapply wax or sealant every few months.
Conclusion
Car detailing at home is an engaging and rewarding process that helps maintain your vehicle’s aesthetic and functional appeal. By following this guide and investing in the right tools and techniques, you can achieve professional-quality results from the comfort of your driveway. Whether you’re a seasoned enthusiast or a beginner, the satisfaction of seeing your car gleam is unparalleled. Happy detailing!


